
Facebook Ads Manager: The Essential Guide
by Aden Andrus


Facebook advertising is a big deal. There’s no arguing with that. With 1.4 billion active daily users spending an average of 50+ minutes a day on Facebook, Messenger and Instagram, it’s no wonder that 93% of marketers regularly use Facebook to advertise.
But how do you make the most of all those daily users and how do you ensure that your Facebook Ads spend is producing meaningful results?
The answer? Facebook Ads Manager.
Facebook Ads Manager is an incredible tool that allows you to set up, manage and report on your Facebook Ads campaigns. It might seem a bit intimidating at first, but it’s actually one of the easier online advertising tools to use once you know what you’re doing.
In this article, we’ll take an in-depth look at the Facebook Ads Manager and how you can use it to set up and run profitable Facebook Ads campaigns!
Note, this post was updated on May 14, 2019.
Using Facebook Ads Manager
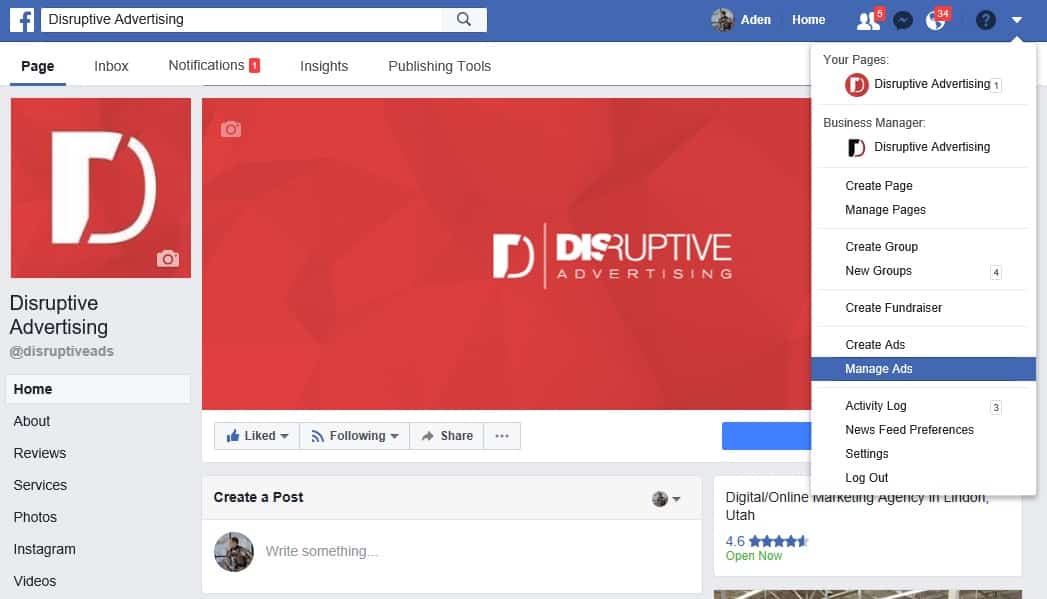
To use Facebook Ads Manager, you’ll need to have a Facebook Ads account (for more information on how to set that up, check out this article). Once you have a Facebook Ads account, accessing the Facebook Ads Manager is as simple as clicking on the small downward arrow in the upper left-hand side of your Facebook page and clicking on “Manage Ads”.
From there, Facebook will take you to the Ad Accounts page. On this page, you can get a quick glimpse of all the ad accounts you have access to (probably only one, but if you’re managing an account for someone else, too, you’ll be able to pick the appropriate account here).
To go straight to your personal account Facebook Ads Manager, you can always type https://www.facebook.com/ads/manager into the URL bar of your browser.
Creating Your First Campaign in Facebook Ads Manager
Once you’ve created your account and accessed Facebook Ads Manager, just click on the green “+ Create” button to create your first campaign.
Next, you’ll be prompted to choose a campaign objective:

Choose your objective, name your campaign and click “Continue” to start selecting your targeting options. Here are some of the settings you’ll need to consider:
Location
If your business is local, only ships to certain areas or only wants to advertise to a certain location, this is a great setting to use. Basically, this option allows you to use various levels of location targeting (city, state, zip code, country, etc) to target anyone within a specified radius of that location.
For example, if you want to target a shopping center, you can type in the name or address and set a radius around your location.
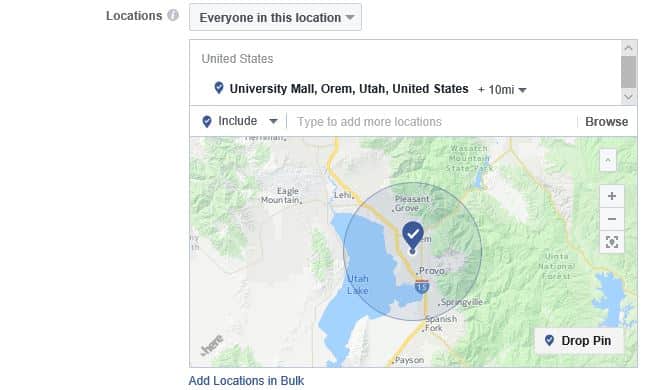
You can also target people who only live in that specific location, which is great if you’re someone like a dentist (versus people who are simply visiting that specific location). Or you can target “everyone in this location,” which includes both residents and people passing by.
Demographics
Depending on who your business typically serves, this setting can be a good way to make sure that your ads are only being shown to people of the right educational level, political affiliation, relationship status or a variety of other categories.
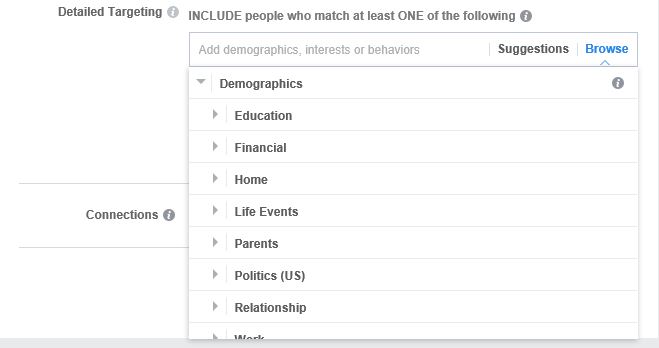
The usefulness of demographic targeting will depend heavily on how well you know the demographics of the audience you want to target. For example, relationship status changes are a great targeting setting for a wedding venue…but not so helpful for a restaurant.
Interests
Facebook determines a person’s “interests” by looking at the listed interests in a user’s profile and the pages they have liked.
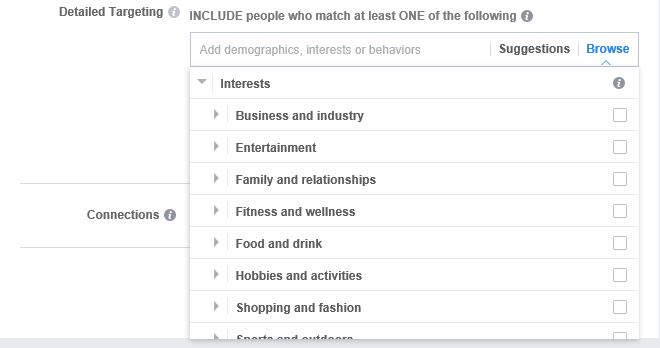
Here again, the usefulness of “Interests” will vary depending on what your business is trying to sell.
Behaviors
Behaviors allows you to target people based on job role, purchasing behavior or other specific actions that a user takes on Facebook.
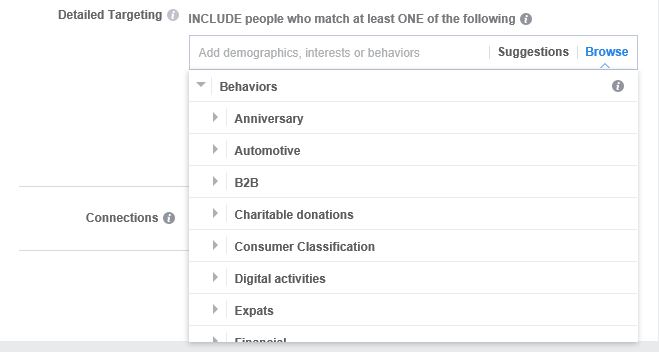
As you might imagine, while these targeting options are interesting, certain companies will get a lot more value out of these targeting options than others. Fortunately, though, audience targeting isn’t your only targeting option for Facebook Ads.
In addition to the general targeting options listed above, there are a couple of other ways to target your ads that you should be aware of.
Retargeting
Another effective way to build an audience on Facebook is through retargeting. Facebook retargeting works much the same as every other type of retargeting, with one special advantage: you can use Facebook retargeting to create lookalike audiences.
We won’t get into the specifics of how to set up and use Facebook retargeting in this article, but it’s a great option to be aware of. For more information on how to set up and use Facebook retargeting, read this article.
Lookalike Audiences
Hopefully, in the process of marketing your business, you’ve collected a large list of emails. The good news is, you can upload that list of emails to Facebook and Facebook will find any profile associated with an email on that list. All of those profiles will go into a new custom audience that you can then target on Facebook.
So, if someone visited your website, filled out a form and then never responded to your outreach attempts, you can use this feature to get back in front of them on Facebook.
However, it doesn’t stop there.
Facebook also has a feature called “lookalike audiences” that identifies Facebook users who are very similar to the users in your email list and creates an audience around those users that you can market to. This algorithm is remarkably effective, which means you can essentially use lookalike audiences to market to thousands or even millions of people who are highly similar to the people who have already expressed an interest in your firm.
As an added bonus, you can use lookalike audiences with your retargeting audiences, too, so you can focus your marketing efforts on the people who are most likely to respond to your ads. To learn more about how to use lookalike audiences, check out this article.
As you adjust your targeting, you’ll notice that the display gauge in the upper right-hand corner of the page updates with estimates of your audience size and estimated daily results.
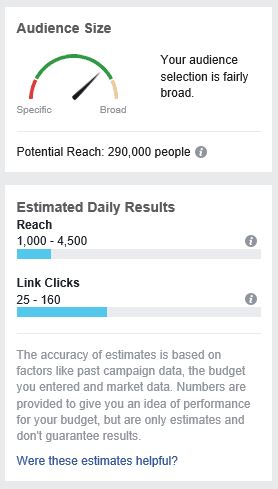
These numbers take your objective, targeting and budget into account to give you an estimate of what you can expect from your advertising.
As you can probably imagine, what you’re selling and the ads you create can have a huge impact on how effective your ads actually are, but it’s a good idea to keep an eye on this information to get a feel for whether or not your targeting and budget are reasonable.
Finally, you have the option to define your budget and what metric Facebook will be optimizing your ad placements for. We’ll go over this quickly here, but for more details on how to pick your budget, check out this article.
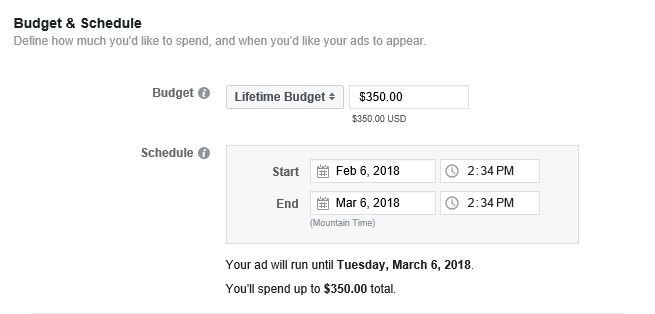
The biggest decision here is whether you choose to run ads with a lifetime budget or a daily budget. With a daily budget, your ads will run all day, every day, but you can run the campaign for as long as you like and Facebook will turn off your ads when you hit your budget.
With a lifetime budget, your ads will run for a set period and you won’t spend more than your budget. However, Facebook may spend more on certain days and less on others. Also, the lifetime budget option gives you access to dayparting, which allows you to control what days and times your ads are shown.

The rest of these settings are fairly specific to your campaign and business goals, so we won’t worry about them for now. On to ad creation!
Creating an Ad
At this point, whether you realized it or not, you’ve created a campaign and an ad set. Now it’s time for the fun part, actually creating your ads! First, you’ll need to pick an ad format:
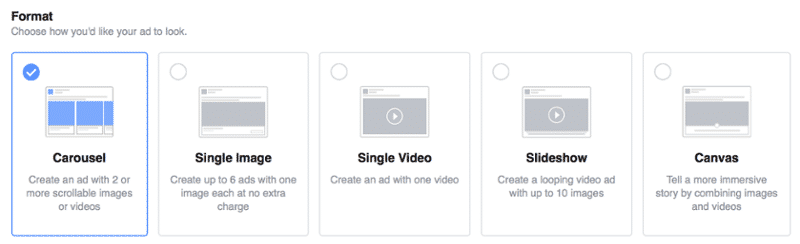
These ad types are fairly self-explanatory and most people opt for a carousel, single image or single video ad type. For certain businesses, canvas ads can be an interesting option as well (for more on that, click here).
At this point, you’ll need to upload a 1,200 pixel by 628 pixel featured image (assuming you’re creating an single image ad, to learn more about the required specifications for other types of ads, check out this article), write your headlines and body copy, pick an appropriate call-to-action and add any links you want people to click on.
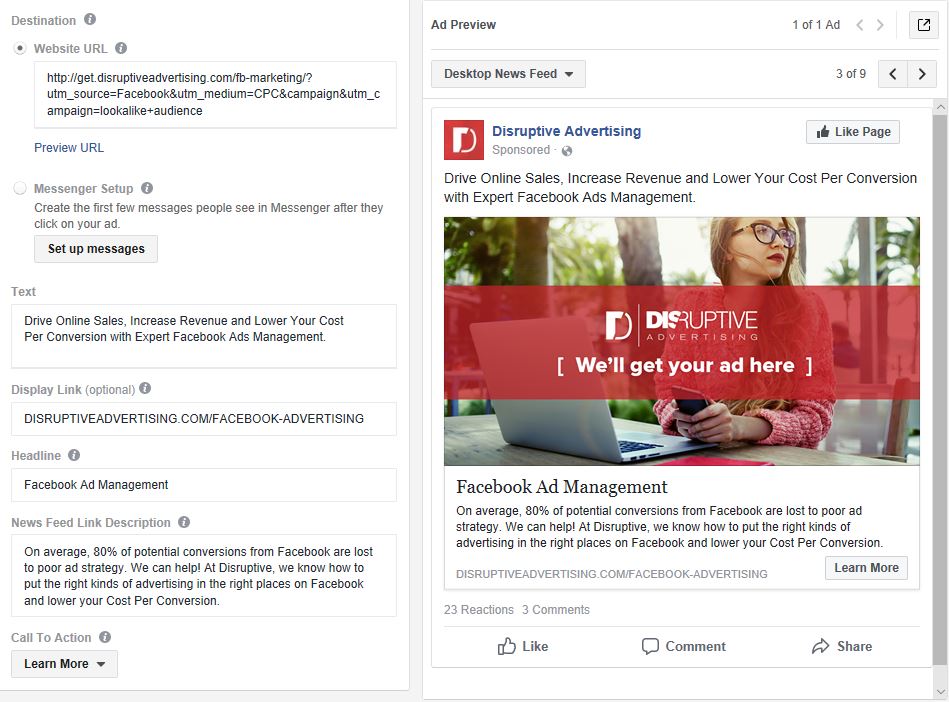
In previous years, Facebook would not allow ads with images that were only 20% text. Today, Facebook is more relaxed about this rule, but it still gives priority to images with less text. Fortunately, Facebook does offer a tool you can use to get a feel for how closely your image follows their guidelines, which you can check out here.
And that’s it, you’ve just created your first Facebook Ads campaign! In just a moment, we’ll a look at how to use the Facebook Ads Manager to optimize this campaign and the many, many others you’ll be creating soon. But first, let’s cover one more basic element of your Facebook Ads Manager account: adding additional users.
Adding Other Users to Your Facebook Ads Manager Account
Now, as you’ve probably guessed by this point, your Facebook Ads Manager account doesn’t have to be exclusive to your Facebook profile. You can share your account with other people or have other people share their account with you.
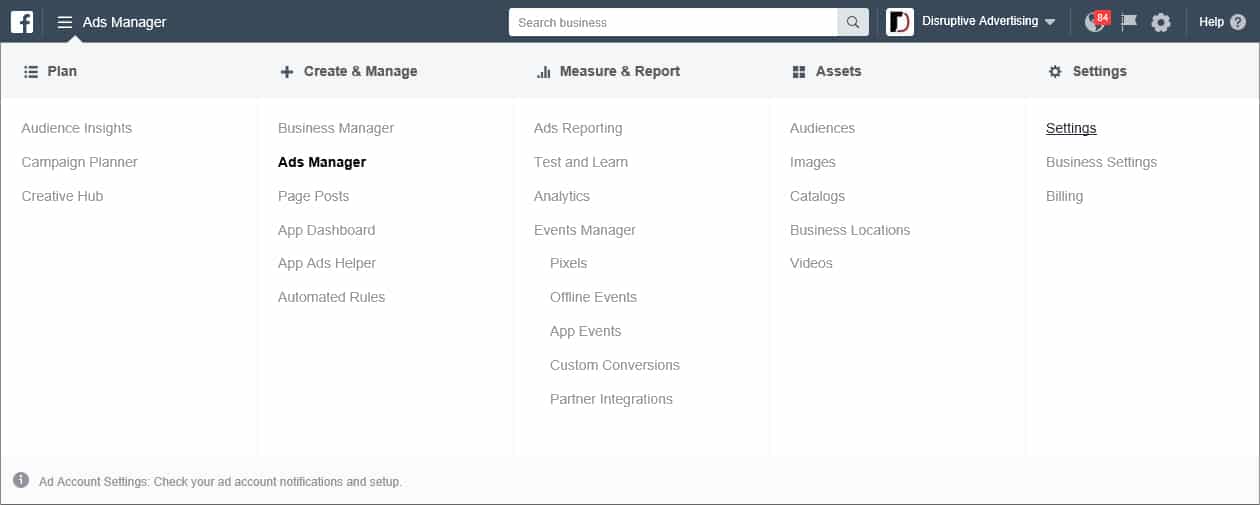
To do this, you’ll need to be in the appropriate Facebook Ads Manager account. Click on the menu icon in the upper left-hand corner and click on “Settings”.
From there, you just need to click on the blue “Add People” button on the right-hand side of the screen. This will give you the ability to search for specific people and add them as users on your ad account.
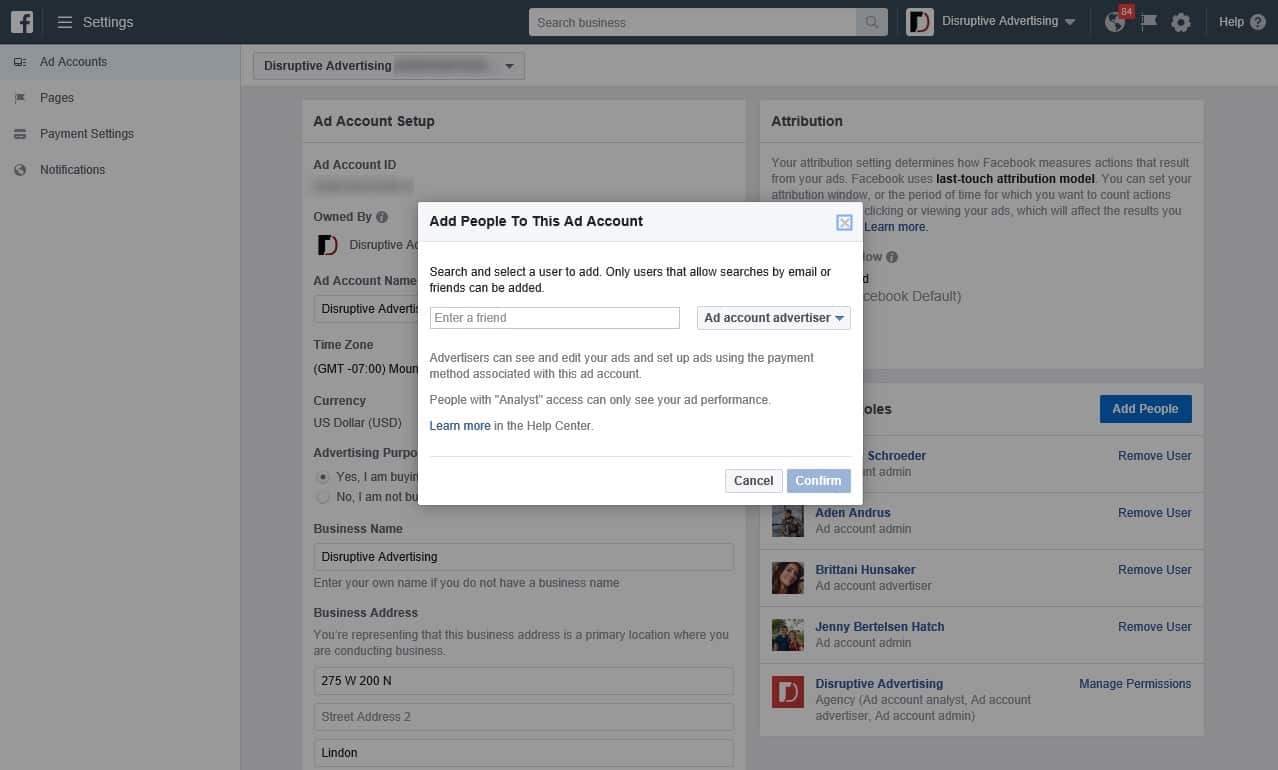
Once you’ve found the appropriate person, you can give them one of three role options:
- Ad account admin. Someone with “Admin” access can do everything you can do in the account, from editing payment details to managing the roles of other people in the account.
- Ad account advertiser. “Advertiser” access gives someone the ability to see, edit and create ads. They can’t touch any of your payment or user settings, but they can set bids for your ads.
- Ad account analyst. This is basically read-only access. An “Analyst” can see ad performance and run reports, but they can’t change anything.
As a quick side note, these ad account roles are separate from Facebook Page roles and Facebook Business Manager roles. Each of these different sets of roles gives you access to different things, so being an admin on your Facebook Page won’t give you access to your Facebook Ads Manager account.
Navigating Facebook Ads Manager
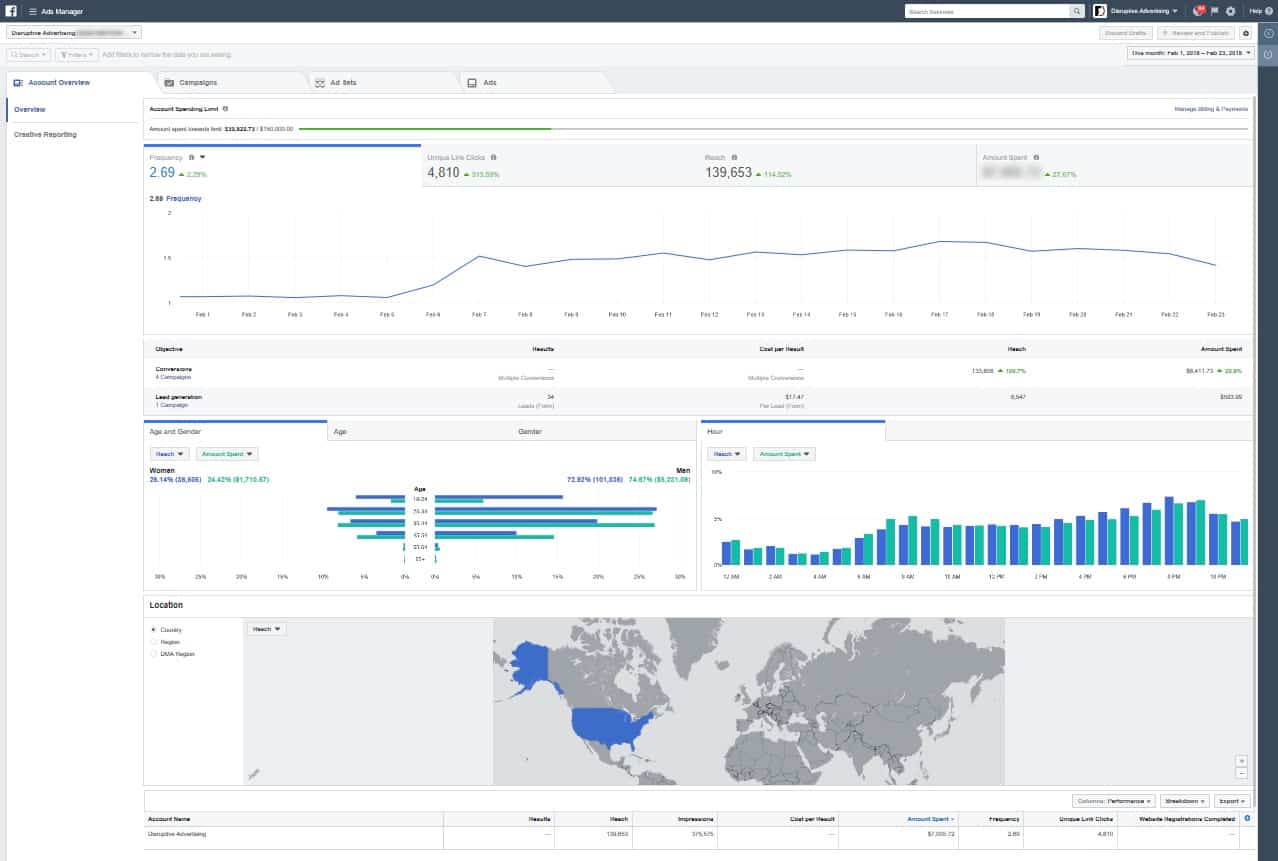
The main Facebook Ads Manager page gives you a lot of information and a lot of options. In fact, Facebook recently updated the “Account Overview” tab to give you even more data and options at a glance:
Feeling a bit overwhelmed? Don’t worry, it’s easier than it looks. Let’s go through each of the tabs and how to use them separately.
Account Overview Tab
The “Account Overview” tab gives you insight into the overall performance of your Facebook advertising. For example, you can quickly see how many clicks your ads have received or how much you’ve spent in a specific time period by clicking on the dropdown menus in the graph sections.
Which information is in which dropdown menu can be a bit difficult to predict, but if you play around with it for a bit, you can quickly access your most important marketing metrics and see them at a glance on this tab.
In addition, this tab is a great place to keep an eye on the demographics of your Facebook ads. Case in point, under the “Age and Gender” section, we can see that approximately 65% of our link clicks come from men (which accounts for roughly 75% of our ad spend).
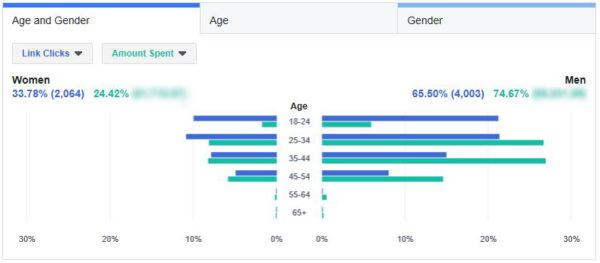
This is a fairly normal distribution for Disruptive and is fairly well aligned with the demographics of our target market. However, a few years ago, we ran an ad that got a ton of clicks from 55+ year old women (not our target market), which indicated that something was off with our messaging and our targeting.
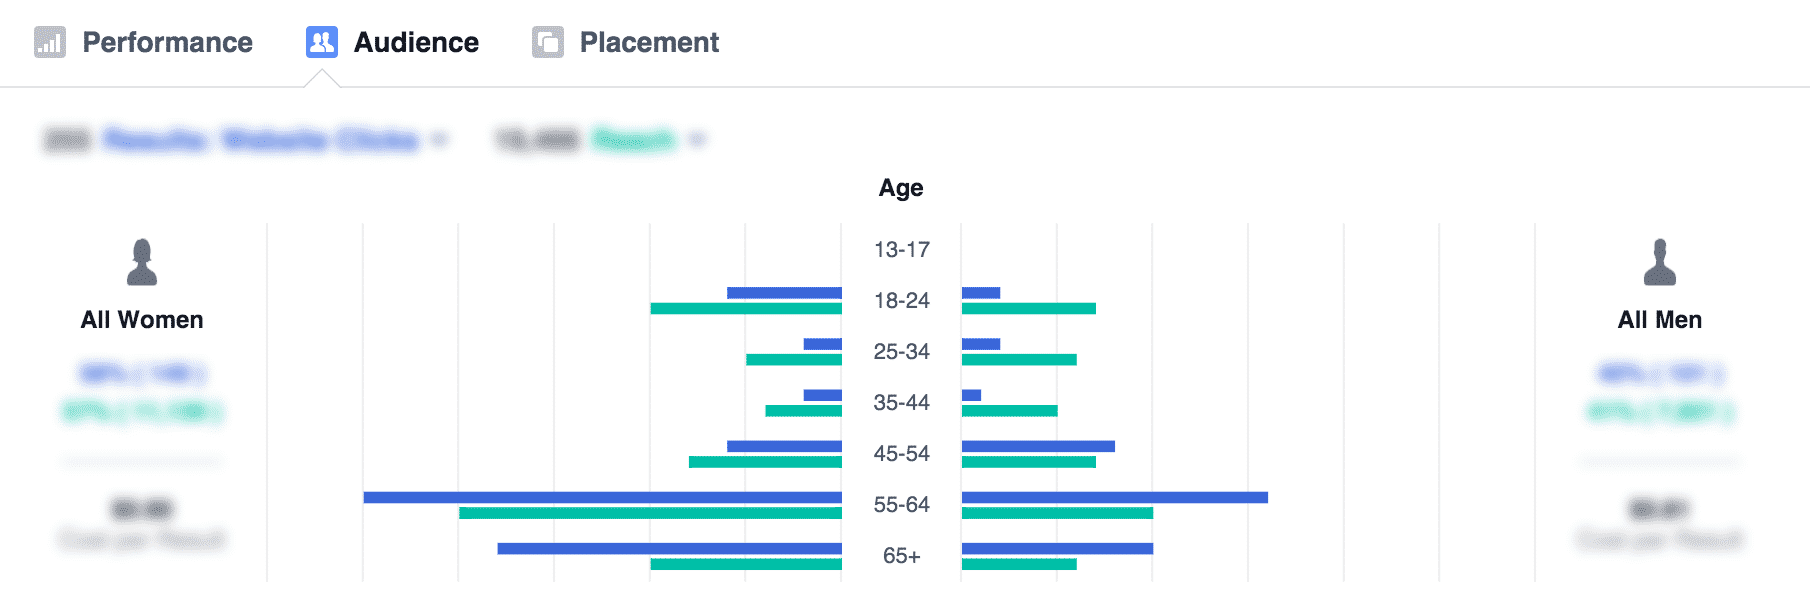
If your normal advertising demographics are fairly stable and consistent with your target audience, a shift like this is a clear red flag that something has gone wrong (for more details on this story, check out this article).
Similarly, you can use the data in the “Hour” or “Location” sections to keep an eye on how well your ads are targeted. If you’re running a local restaurant in San Francisco, but most of your ad impressions and/or clicks are happening in New York at midnight, your campaign settings probably need some work.
Finally, clicking on “Creative Reporting” on the left-hand side of the screen gives you access to a handy report that combines the results of ads with the same imagery and ad copy (but different campaigns or ad sets). This allows you to compare your ad creative and easily identify trends.
Unfortunately, if you are running the same creative for very different audiences, this aggregate report can quickly become useless, so keep that in mind as you use it.
Campaigns Tab
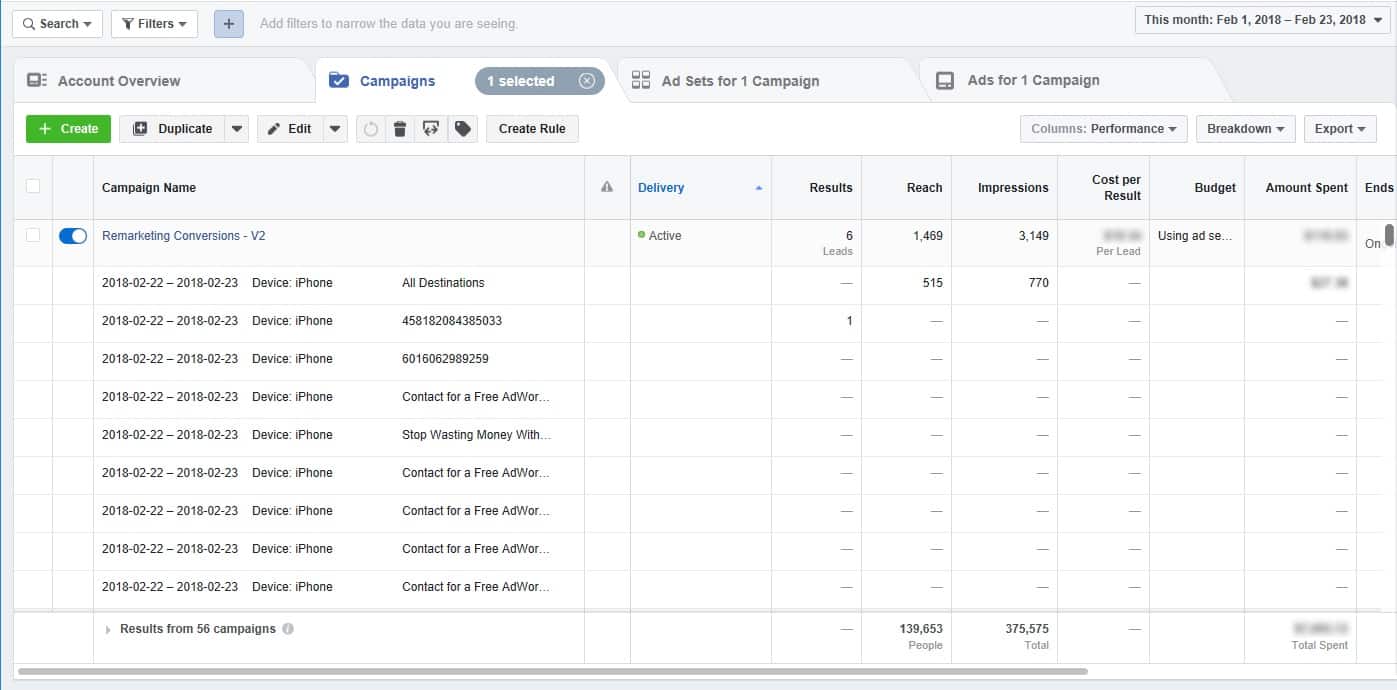
The “Campaigns” tab doesn’t provide as much broad demographic data as the “Account Overview” tab, but its data is a lot more granular and generally useful.
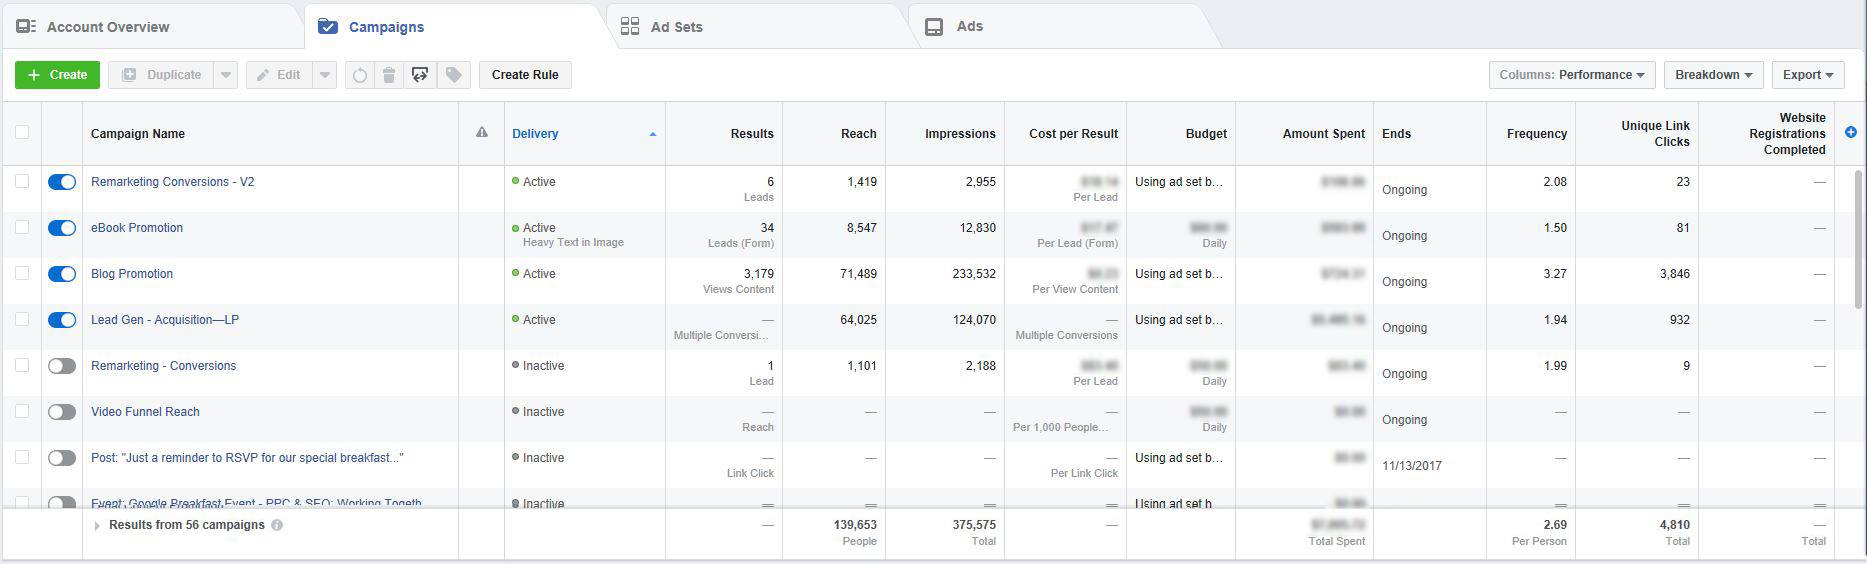
Under the “Campaigns” tab, you can see which campaigns are currently running and the results for all of your campaigns during your chosen time period. This is a great way to get a feel for the overall performance of your account, since different campaigns have different target audiences and different objectives.
With all of the different types of Facebook ads, audiences and objectives, the aggregate data in the “Account Overview” tab isn’t always very helpful for evaluating your advertising performance. A cost-per-click (CPC) of $5.00 might be terrible in one campaign and great in another, but on the “Account Overview” tab, you can’t tell the difference.
If you create different campaigns for each audience and objective (and you should), the “Campaigns” tab will allow you to quickly determine whether or not your campaigns are delivering the kind of results you need, so this is my preferred go-to tab for keeping an eye on the performance of a Facebook Ads account.
You can edit individual campaign settings like the campaign name or spending limit by checking the box next to a specific campaign and clicking the “Edit” button or you can add a new campaign by clicking the green “+ Create” button.
Ad Sets
The “Campaigns” tab is great for big-picture data, but if a campaign isn’t performing well, the “Campaigns” tab doesn’t really help you figure out why.
To get at that information, you’ll want to click on the appropriate campaign in the “Campaigns” tab, which will take you to that campaign’s “Ad Sets” tab (note, this is usually a much more effective way to use the “Ad Sets” tab than simply clicking on the tab itself, which takes you to an unfiltered “Ad Sets” tab, which can be kind of overwhelming).
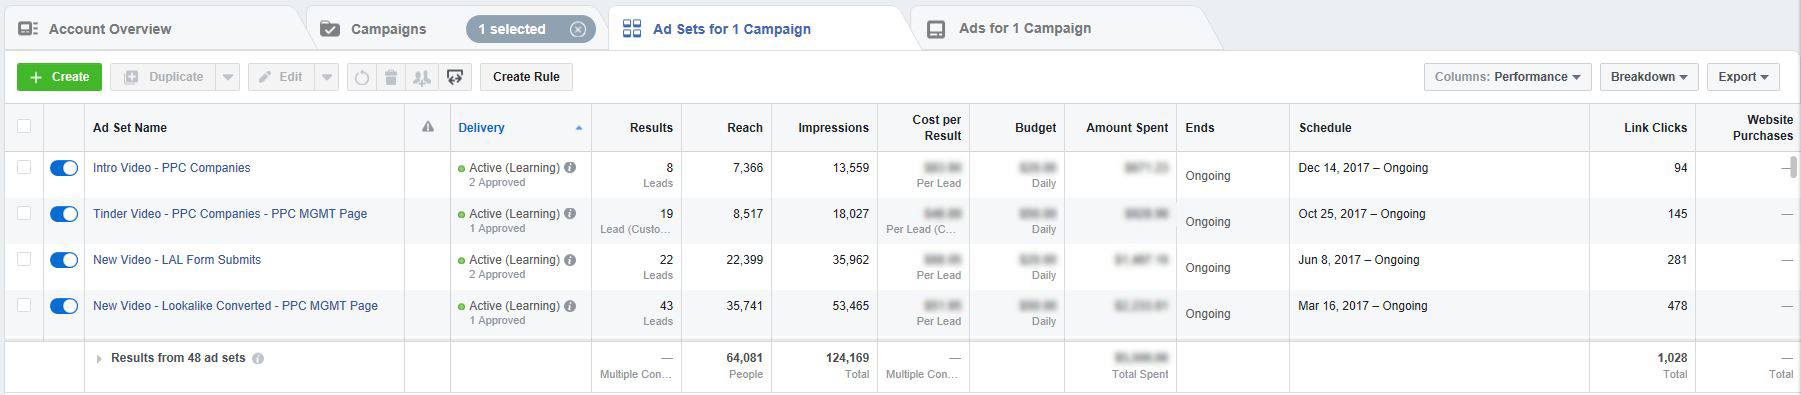
Under this tab, you can compare the performance of different ad sets (shocker, I know…). Like the “Campaigns” tab, this gives you the ability to take a broad look at how different ad sets are performing using the same campaign settings.
One thing to keep in mind as you evaluate your ad sets is that objectives and audiences are chosen at the ad set level, not the campaign level, so you can still have ad sets with wildly different results that are performing well within the same campaign.
Also, keep in mind that Facebook’s algorithm runs through a learning phase with each new ad set’s targeting, so you may see a “(Learning)” note in the “Delivery” column of the “Ad Sets” tab if Facebook is still trying to optimize a specific ad set. If the algorithms are still in the learning phase, you may want to give an ad set a little more time, even if it isn’t currently performing very well.
As with the “Campaigns” tab, you can add a new ad set by clicking the green “+ Create” button. You can also edit the name, start and end date and/or targeting settings for a specific ad set by checking the box next to the ad set and clicking the “Edit” button.
Ads Tab
Finally, we have the “Ads” tab. The “Ads” tab allows you to see and compare the results of each individual ad in an ad set. If you click on an ad set in the “Ad Sets” tab, Facebook will only show you the ads in that ad set under the “Ads” tab.

Depending on how you set up your Facebook campaigns and ad sets, you may love this tab or you may never use it. For example, if you tend to use the same ads on a variety of audiences, you probably only have one ad in each ad set, so this tab won’t be very useful.
On the other hand, if you only have one audience, but you are trying a lot of different ads, this tab may be one of your favorites, since it allows you to directly compare ad performance (of course, in this situation, the “Creative Reporting” option in the “Account Overview” tab may be the way to go).
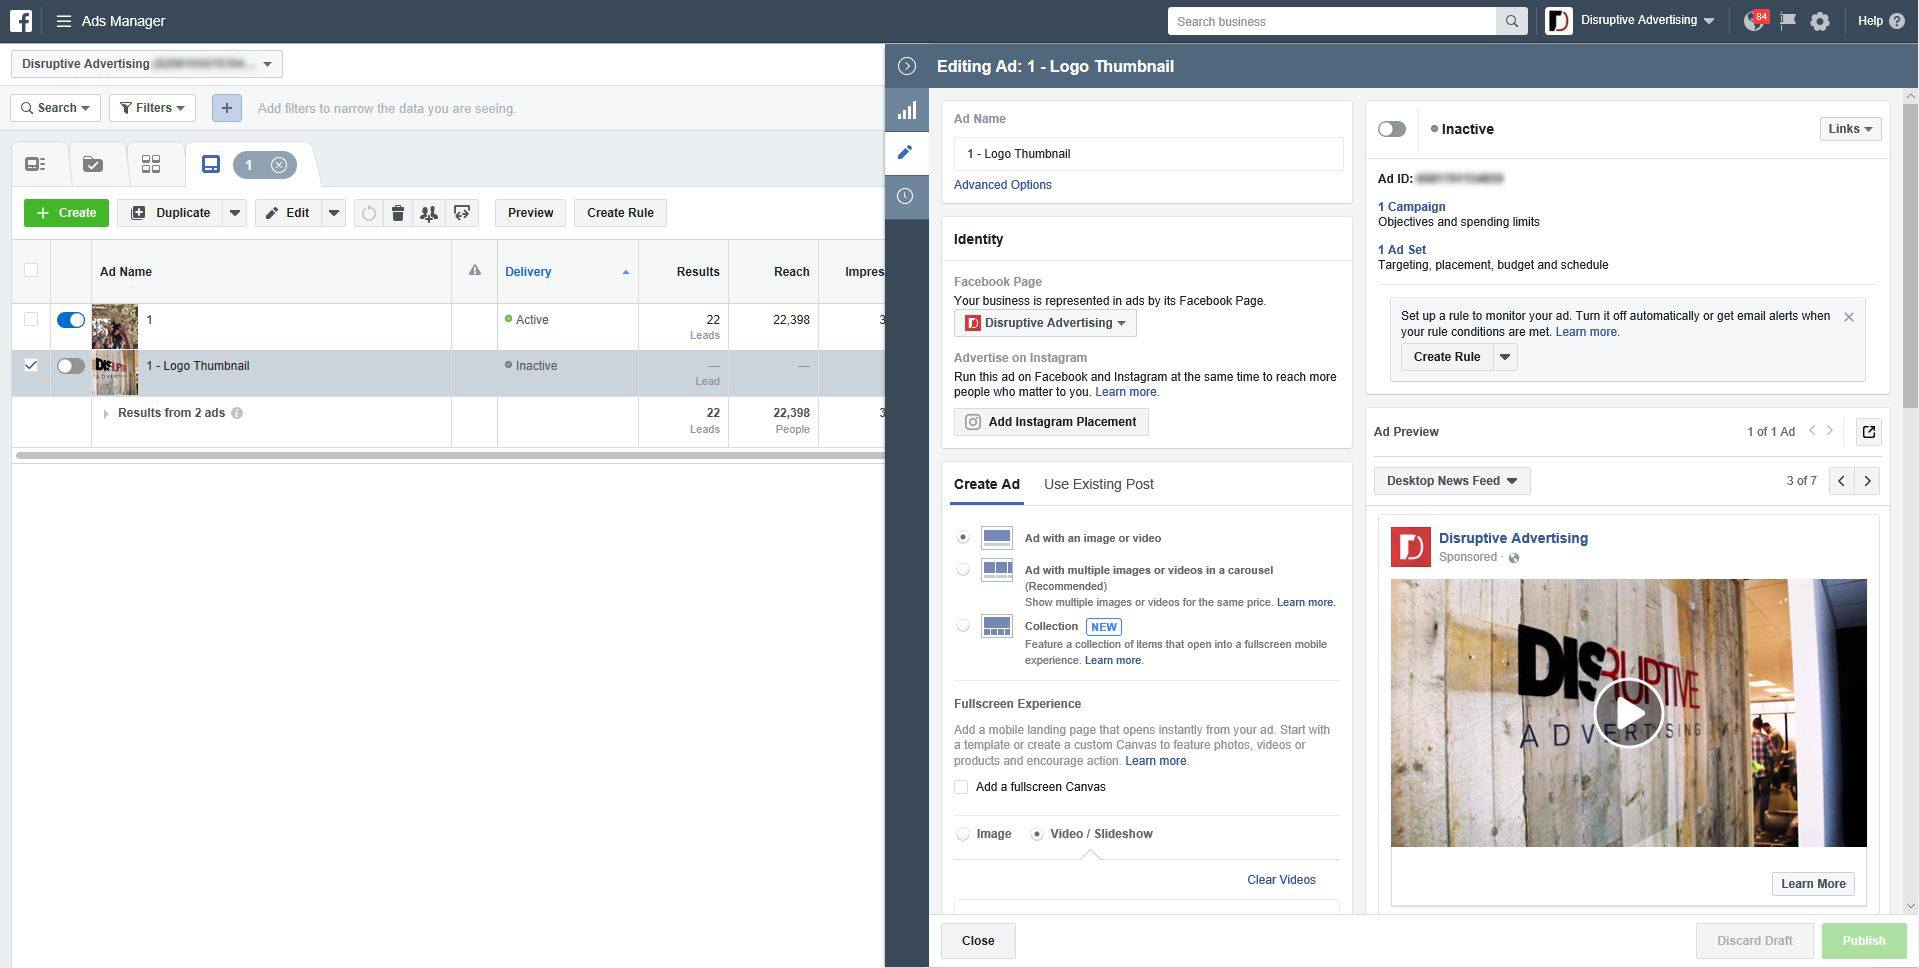
To create a new ad that will run within your chosen ad set, click the “+ Create” button. To directly edit an existing ad, you’ll need to click on the “Edit” option directly underneath the ad name:
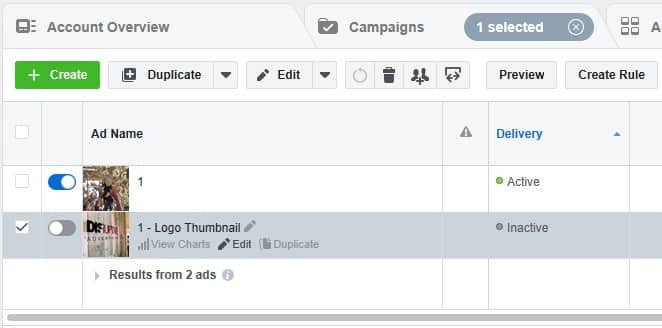
This will bring up the editing options pane on the right side of your screen, where you can edit ad copy, destination URL, image, etc to your heart’s content.
However, unless you’re trying to make changes before an ad has launched or tweak something minor, keep in mind that it’s usually best to duplicate your ad and then change the new ad so that it’s easy to keep track of which ad content produced which results.
Using Facebook Ads Manager
Facebook provides a wealth of data on the performance of your ads, but identifying the right data and getting at that data can sometimes be a challenge. To help you out, let’s take a look at how Facebook Ads Manager reports data.
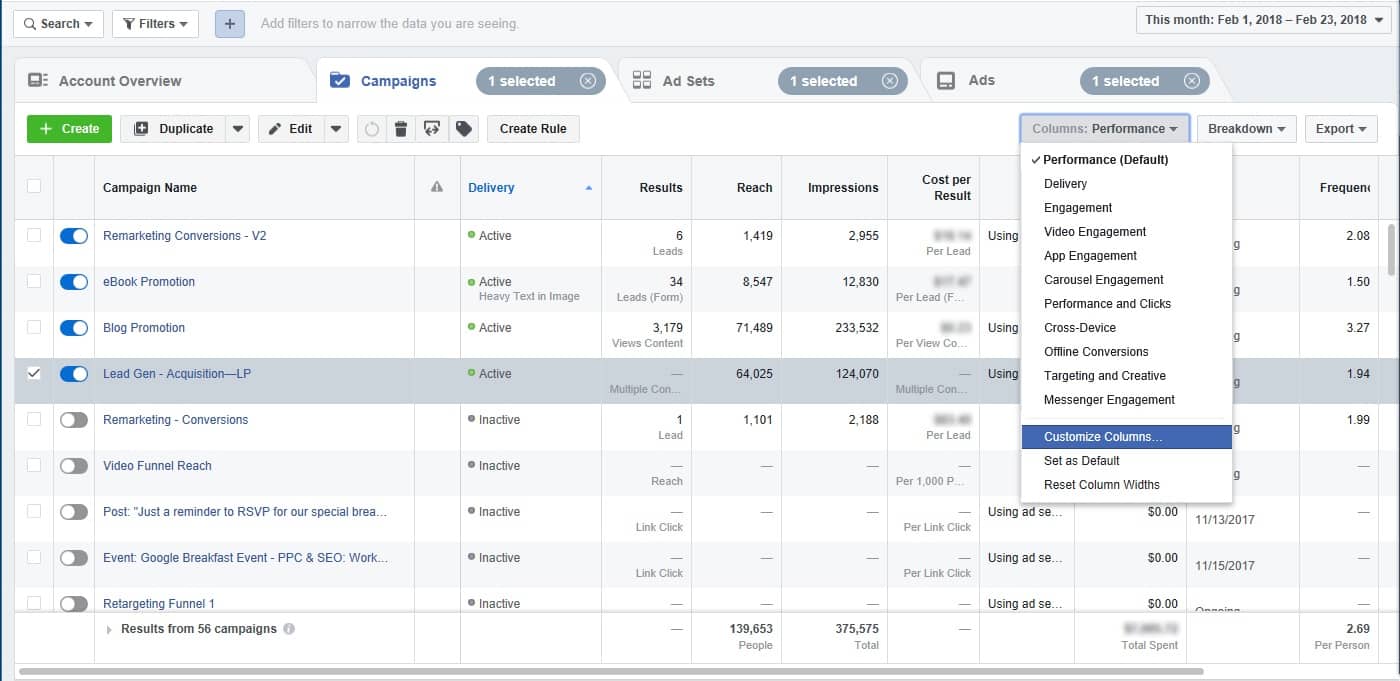
Preset Columns
Facebook Ads Manager allows you to create your own custom data filters, but most of the time, their standard presets will be all you will need to evaluate the performance of your ad campaigns (available in the “Columns” dropdown menu).
Here are the basic presets and some of the more important metrics they cover:
- Performance. Results, Reach, Costs, Amount Spent
- Delivery. Reach, Frequency, CPM, Impressions
- Engagement. People Taking Action, Reactions, Comments, Shares
- Video Engagement. Impressions, 3-Second Video Views, Cost per 3-Second Video Views
- App Engagement. Mobile App Installs, Mobile App Actions, Cost per Mobile App Install, etc.
- Carousel Engagement. Reach, Frequency, Impressions, Clicks
- Performance and Clicks. Results, Reach, Cost
- Cross-Device. Website Actions, Mobile Apps Install, Website Action, Conversion Value
- Offline Conversions. Purchase, Purchase Conversion Value, Cost per Purchase
- Targeting and Creative. Clicks (All), Clickthrough Rate (All), Cost per Click (All)—this is the same as the Creative Reporting data
- Messenger Engagement. Link Clicks, Messaging Replies, Blocked Messaging Conversations
As I mentioned before, one or more of these column presets should cover the bulk of most advertiser’s reporting needs, but if you need something different, you can always create your own custom column sets.
Custom Columns
To create your own custom column sets, click the “Columns” dropdown menu and click on “Customize Columns”.
Here, you can add, remove or rearrange columns to meet your needs:
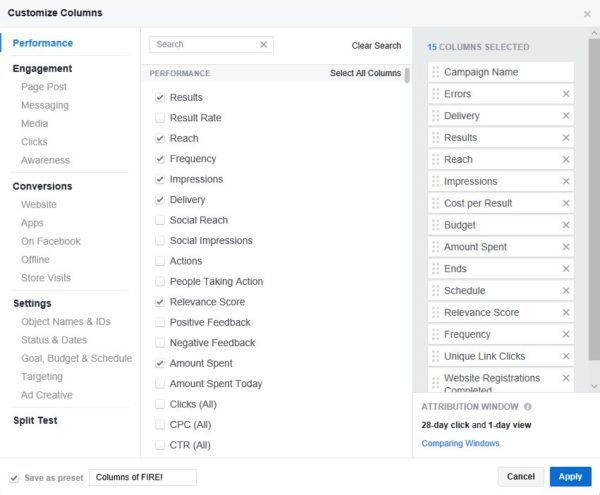
If adding in a few extra columns is a one-off that you won’t need in the future, just click “Apply” to view your new column set. However, if you want to save your custom set of columns for future use, check the box in the lower left-hand corner and name your custom column set.
Interpreting Your Data
As nice as having the right columns in your report is, sometimes you need additional information to correctly interpret your data.
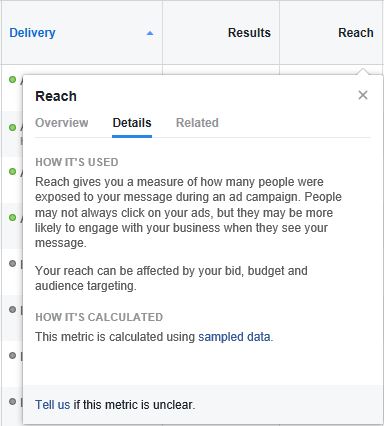
First off, if you’re not quite sure what a given metric name is describing (and let’s be honest, with the dozens of metric names, sometimes it can get a bit confusing), all you have to do is hover your mouse over the column heading and Facebook will give you all sorts of details about the metric.
Another way to get more information out of your Facebook Ads Manager data is to use the “Breakdown” menu just to the right of the “Columns” dropdown menu. This menu will allow you to add subcategories to each row of your report using one of the following options:
- Time. Break down your results by the specific day, week, two weeks or month.
- Delivery. Break down your results by age, gender, business locations, country, geographical area, device, platform, time of day…and the list goes on.
- Action. Break down your results by conversion device, post reaction type, destination, link click destination, video view type, video sound and carousel card.
You can pick one criterion from each category (up to three total). So, if you want to break a year’s worth of data down by week, device and destination, you can. It may not be very useful data, but you can break it down to that degree…
Typically, breaking down your data this way works best when you only use a single criterion, but there are times when it is nice to have the option to use a second or third criterion.
You can always export your data by clicking on the double arrow button near the “Create Rule” button.
Speaking of which, Facebook does have a very limited rule generator you can use to automate certain actions in your account.
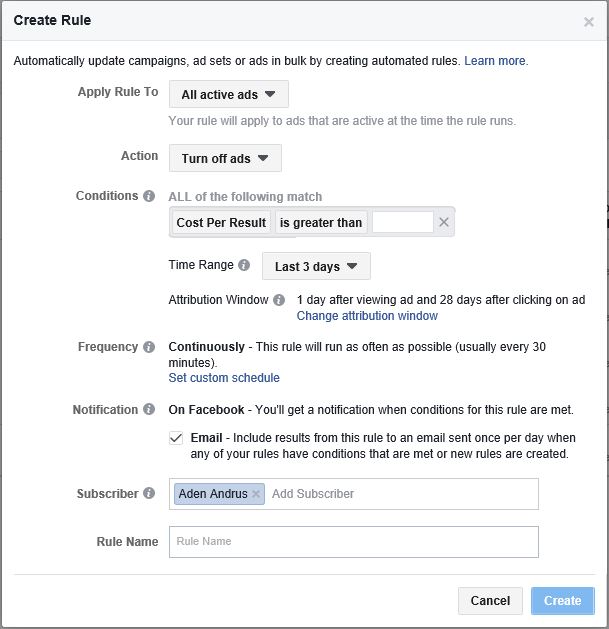
This rule generator isn’t nearly as robust as the rules or scripts you can run in, say, Google AdWords, but it can be handy for a few things (especially if you’re worried about your CPC jumping up when you’re not looking).
Conclusion
And that’s the basics! The Facebook Ads Manager isn’t a terribly complex platform and once you know what you’re doing, it’s fairly easy to use.
If you find that you need more robust campaign, ad set or ad duplication and manipulation features (especially in bulk), the Power Editor is probably your best bet, but for day-to-day tasks the Facebook Ads Manager is a great option.
By the way, if you’d like help figuring out some aspect of the Facebook Ads Manger or want some general recommendations on running an effective Facebook campaign, let me know here or in the comments. I’d love to help!
What do you think of the Facebook Ads Manager? What are some of your favorite features? Have a trick you’d like to share? Leave your thoughts in the comments.


